Quick start: a working cluster
MooseFS joins the disks of several machines into one file system, which client machines mount and use the way they use a local file system. A Master Server holds the file system itself: the directory tree, the names, and the record of where every piece of every file is stored. Chunkservers hold the pieces. A client presents the Master Server and the Chunkservers as a mounted directory.
A cluster is those three kinds of process running and talking to each other.
This page shows how to build one. All the commands that the cluster needs are on this page,
in the order in which you run them, with the choices already made. Set the
switch on the first code block to your operating system. Every other block on
the page follows that switch. Run everything as root. Each step ends with a
link to the page that covers that step in full. Nothing here depends on
following those links.
Four machines, one process each
- Master,
192.0.2.11: the Master Server, and the GUI beside it. - Chunkserver 1,
192.0.2.12, and Chunkserver 2,192.0.2.13: a Chunkserver each. - Client,
192.0.2.14: the mount you write files into.
Every machine needs a supported operating system. Each of the two Chunkserver machines needs one disk reserved for MooseFS alone. Open these ports between the machines:
- on the Master machine:
9419and9420from both Chunkservers,9421from the Client, and9425from the browser that opens the GUI; - on both Chunkserver machines:
9422from the Client and from the other Chunkserver.
Network ports describes what each port carries. A port
closed between a Chunkserver and the Master Server produces no error: every step
below still reports success. Step 7 shows the closed port as a missing copy. A
port closed between the client and the Master Server stops step 6 instead, with
can't connect to mfsmaster. Two Chunkservers is the smallest cluster that
meets the shipped defaults: a new instance keeps two copies of every chunk. The
two copies are stored on two different Chunkservers.
In this example, each component runs on a machine of its own, with an address of its own. This is also the usual layout of a real cluster. Replace the four addresses above with your own. Several components can also run on one machine. Several processes on one machine covers what that needs.
The commands install MooseFS PRO. This documentation covers both PRO and the Community Edition. The Community Edition is released separately, with package names and a repository path of its own.
Steps 1 and 2 run on all four machines
Two things have to be true on every machine before any component is installed: the machine can fetch MooseFS packages, and the machine can find the Master Server. Run both steps on the Master, on both Chunkservers, and on the Client.
1. Add the MooseFS repository
The packages come from repository.moosefs.com, so every machine needs that
repository and its signing key before any MooseFS package can be installed.
- Ubuntu / Debian
- RHEL family
- FreeBSD
apt update
apt install gnupg
mkdir -p /etc/apt/keyrings
curl https://repository.moosefs.com/moosefs.key | gpg -o /etc/apt/keyrings/moosefs.gpg --dearmor
# Replace noble with your release codename, and ubuntu with debian on Debian.
echo "deb [arch=amd64 signed-by=/etc/apt/keyrings/moosefs.gpg] http://repository.moosefs.com/moosefs-5/apt/ubuntu/noble noble main" > /etc/apt/sources.list.d/moosefs.list
apt update
gnupg provides the gpg command that the key line calls. A minimal Debian or
Ubuntu install does not include gnupg. Without it, the key step fails with gpg: command not found and adds no key. The first apt update is needed for
that install to run. On a system whose package lists were never fetched,
apt install gnupg reports Package 'gnupg' has no installation candidate instead.
The last apt update reads the repository that the echo line added.
curl https://repository.moosefs.com/RPM-GPG-KEY-MooseFS > /etc/pki/rpm-gpg/RPM-GPG-KEY-MooseFS
# Files for el8 and el10 carry those releases.
curl https://repository.moosefs.com/MooseFS-5-el9.repo > /etc/yum.repos.d/MooseFS.repo
# 14:x86:64 names the release and the architecture.
echo 'moosefs: { url: "http://repository.moosefs.com/moosefs-5/freebsd/14:x86:64", enabled: yes, mirror_type: NONE }' > /etc/pkg/moosefs.conf
pkg update
More: the repository on every supported system.
2. Make the master name resolve
Every component looks for the Master Server under the name
mfsmaster. As long as that name resolves to the
Master machine, no configuration file on any of the four machines needs an
address in it.
echo "192.0.2.11  mfsmaster" >> /etc/hosts
getent hosts mfsmaster
More: the DNS records a real cluster uses instead.
The rest is one machine at a time
Each step below names the machine to run it on. Run the steps in the order in which they appear: a Chunkserver registers with a Master Server that is already answering. The client mounts a cluster that already has its disks.
3. On the Master machine: install and start the Master Server and the GUI
This step installs the process that holds the file system on the Master machine, together with the web interface that shows what the cluster is doing.
- Ubuntu / Debian
- RHEL family
- FreeBSD
apt install moosefs-pro-master moosefs-pro-gui
systemctl start moosefs-pro-master
systemctl enable --now moosefs-pro-gui
mfsmaster test
dnf install moosefs-pro-master moosefs-pro-gui
systemctl start moosefs-pro-master
systemctl enable --now moosefs-pro-gui
mfsmaster test
pkg install moosefs-pro-master moosefs-pro-gui
cp /var/mfs/metadata.mfs.empty /var/mfs/metadata.mfs
chown mfs:mfs /var/mfs/metadata.mfs
sysrc mfsmaster_enable=YES mfsgui_enable=YES
service mfsmaster start
service mfsgui start
mfsmaster test
The copy is the only step here that differs on FreeBSD. The package installs
metadata.mfs.empty in the data directory,
but not metadata.mfs. Without the copy, a
first start fails with init: metadata manager failed !!!. The Linux packages
install that file themselves.
mfsmaster test answers mfsmaster pid: PID. The package ships everything that
this start needs: an empty file system and the whole tree exported read-write to
every host. In PRO PRO (PRO Edition only), the package also ships a 10 TiB Personal
license for non-commercial use. That license is valid
until you install one of your own.
More: every server package and the settings it takes.
4. On both Chunkserver machines: give the disk a file system
A Chunkserver stores the pieces of files as ordinary files, so each of the two
machines needs one file system reserved for MooseFS alone. /dev/sdb
(/dev/da1 on FreeBSD) represents the disk that you give to MooseFS. Its
contents are erased. On Linux, the disk gets a single partition. The file system
is created on that partition. On FreeBSD, the ZFS pool uses the whole disk.
- Ubuntu / Debian
- RHEL family
- FreeBSD
apt install parted
parted -s /dev/sdb mklabel gpt mkpart primary 0% 100%
mkfs.ext4 /dev/sdb1
mkdir -p /mnt/chunk01
echo "UUID=$(blkid -s UUID -o value /dev/sdb1) /mnt/chunk01 ext4 defaults 0 2" >> /etc/fstab
mount /mnt/chunk01
df -h /mnt/chunk01
dnf install parted xfsprogs
parted -s /dev/sdb mklabel gpt mkpart primary 0% 100%
mkfs.xfs /dev/sdb1
mkdir -p /mnt/chunk01
echo "UUID=$(blkid -s UUID -o value /dev/sdb1) /mnt/chunk01 xfs defaults 0 2" >> /etc/fstab
mount /mnt/chunk01
df -h /mnt/chunk01
zpool create -m /mnt/chunk01 chunk01 /dev/da1
df -h /mnt/chunk01
The first line of each Linux block installs what a minimal system does not
include: parted on both, and xfsprogs for mkfs.xfs on the RHEL family.
More: choosing and mounting the chunk disks.
5. On both Chunkserver machines: install and start the Chunkserver
The Chunkserver makes that disk available to the cluster and stores data on it. Run this step on Chunkserver 1, then on Chunkserver 2.
- Ubuntu / Debian
- RHEL family
- FreeBSD
apt install moosefs-pro-chunkserver
echo /mnt/chunk01 >> /etc/mfs/mfshdd.cfg
chown mfs:mfs /mnt/chunk01
systemctl enable --now moosefs-pro-chunkserver
mfschunkserver test
dnf install moosefs-pro-chunkserver
echo /mnt/chunk01 >> /etc/mfs/mfshdd.cfg
chown mfs:mfs /mnt/chunk01
systemctl enable --now moosefs-pro-chunkserver
mfschunkserver test
pkg install moosefs-pro-chunkserver
echo /mnt/chunk01 >> /usr/local/etc/mfs/mfshdd.cfg
chown mfs:mfs /mnt/chunk01
sysrc mfschunkserver_enable=YES
service mfschunkserver start
mfschunkserver test
mfschunkserver test answers mfschunkserver pid: PID while the process runs,
and mfschunkserver is not running when the process has stopped. The system log
then names the step that failed. The disk list is the only setting that a
Chunkserver needs here, because the Chunkserver reaches the Master Server under
the name that was set in step 2.
More: what a Chunkserver stores and how it is configured.
6. On the Client machine: install the client and mount
The client presents the cluster as a directory. From here on, the Client machine
reads and writes MooseFS through /mnt/mfs.
- Ubuntu / Debian
- RHEL family
- FreeBSD
apt install moosefs-pro-client
mkdir -p /mnt/mfs
mfsmount /mnt/mfs
df -hT /mnt/mfs
dnf install moosefs-pro-client
mkdir -p /mnt/mfs
mfsmount /mnt/mfs
df -hT /mnt/mfs
pkg install moosefs-pro-client
kldload fusefs
mkdir -p /mnt/mfs
mfsmount /mnt/mfs
df -hT /mnt/mfs
kldload loads the module for this boot only. The /boot/loader.conf entry
that loads the module again after a reboot is part of installing the client on
FreeBSD.
df -hT shows the mount in the filesystem column: the subtype that the client
registers with FUSE, then the address and port of the Master Server that the
client connects to, mfs#mfsmaster:9421. The type column shows fuse on Linux
and fusefs on FreeBSD. The size columns already show the space of the cluster,
not the space of the local disk.
More: mount options and the mount that survives a reboot.
7. On the Client machine: write a file and find both of its copies
The last step checks the whole path at once: a file written into the mount can be read back. The cluster reports the two Chunkservers that hold the two copies of the file.
echo "MooseFS first write" > /mnt/mfs/first-write.txt
cat /mnt/mfs/first-write.txt
mfsfileinfo /mnt/mfs/first-write.txt
/mnt/mfs/first-write.txt:
	chunk 0: 0000000000000801_00000001 / (id:2049 ver:1) ; mtime:1787227200 (2026-08-20 14:00:00)
		copy 1: 192.0.2.12:9422 ; status:VALID
		copy 2: 192.0.2.13:9422 ; status:VALID
Two copies, both VALID, one on each Chunkserver machine, is the healthy
result. It means that the whole path works: the Master Server created the file,
both Chunkservers stored a copy, and the read succeeded. A copy count below two,
or any other status, is a symptom to start from in
Troubleshooting.
The GUI shows the state of the whole cluster. The GUI runs on
the Master machine and is available at http://192.0.2.11:9425/. There is no
HTTPS address to open instead: the GUI server serves plain HTTP and has no login
of its own. A cluster used outside the lab therefore needs a reverse proxy in
front of it.
The certificate is installed on that proxy.
The Status tab of the GUI shows the health of the cluster. The Chunkservers tab
lists both servers. The GUI package also installs the CLI on the Master machine.
There, mfscli -H mfsmaster -SCS prints the same list in the terminal.
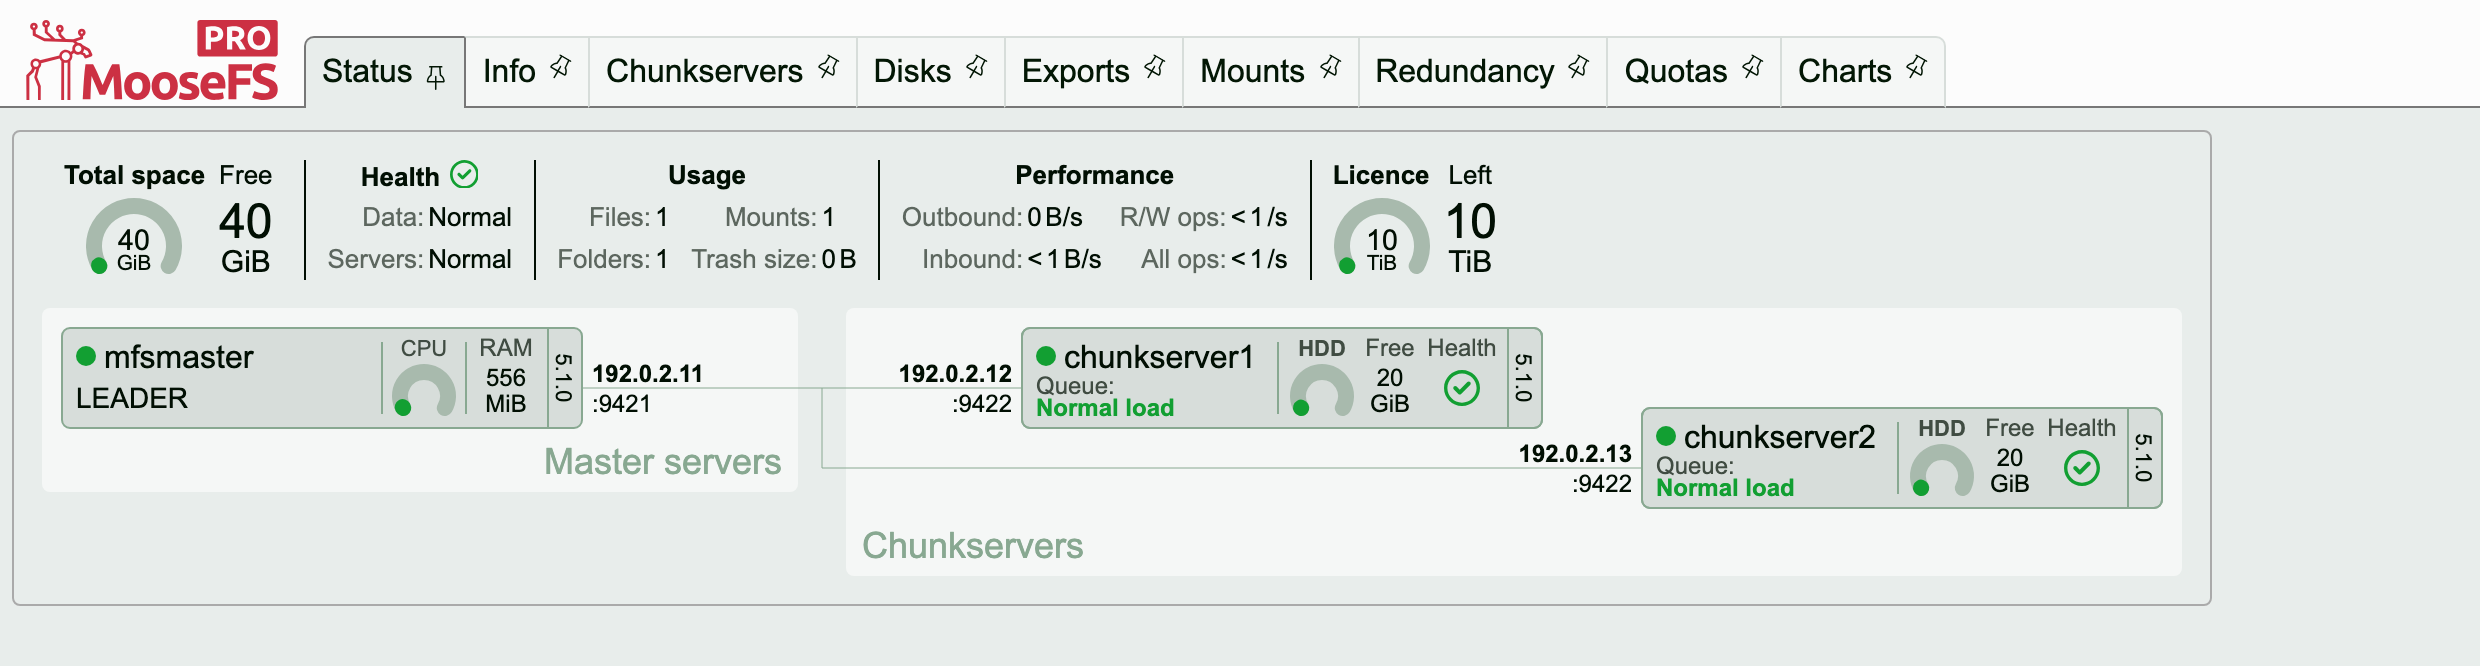
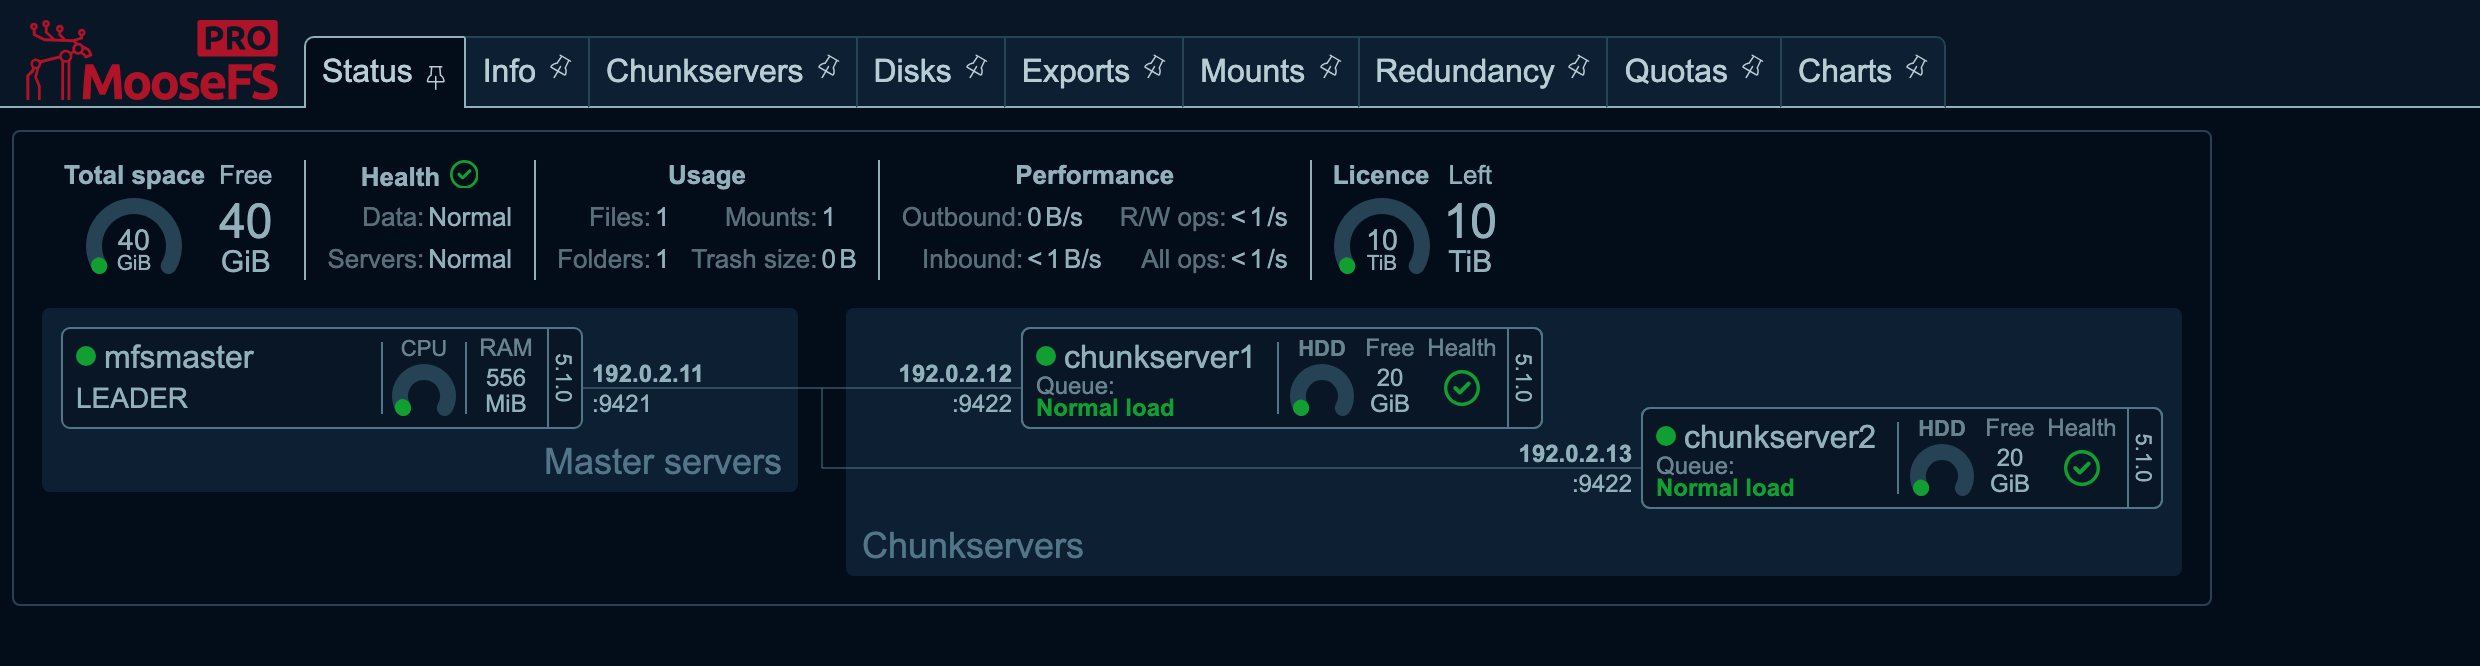
The Status tab of the cluster built on this page, after step 7: the Master
Server at 192.0.2.11 in the LEADER role, both Chunkservers at 192.0.2.12
and 192.0.2.13, and Health showing Normal over the one file that step 7
wrote.
More: every reading a finished deployment is checked against.
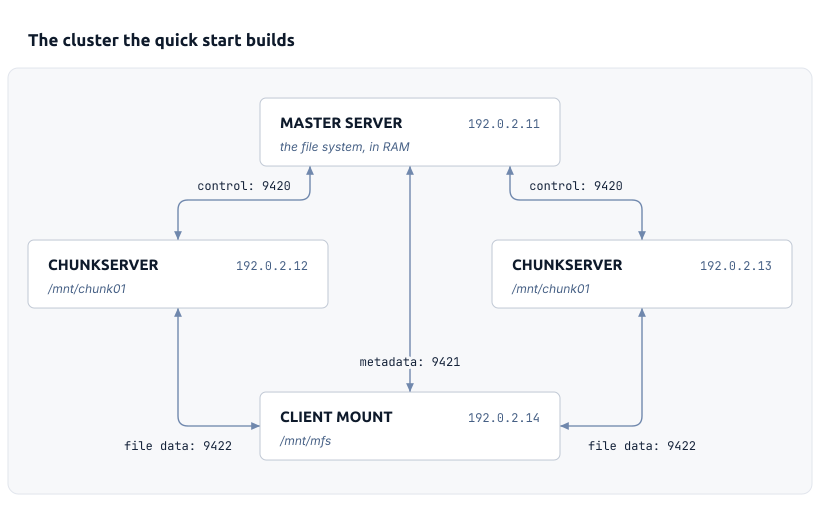
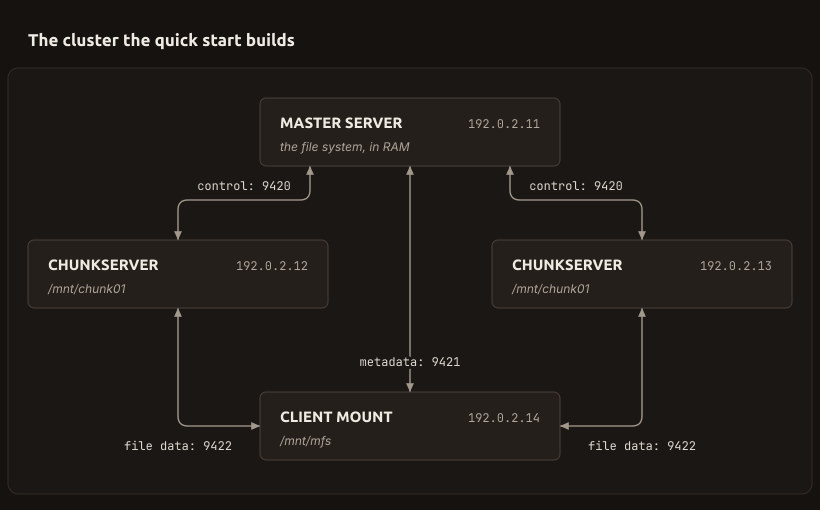
The cluster the quick start builds. Four machines, one process each: metadata goes to the Master Server, file data straight to the Chunkservers. The client asks the Master Server where a file lies, and moves the bytes with the Chunkservers. The Master Server keeps a connection with each Chunkserver. Over it, the Chunkserver reports its chunks and receives orders, such as creating a chunk for a new write. Nothing runs between the two Chunkservers as long as no copy has to be rebuilt.
The cluster is up
Seven steps built a working MooseFS cluster. /mnt/mfs on the client machine is
an ordinary path from here on. Any program writes files to it and reads them
back without knowing that three other machines provide it.
The Master Server holds the file system itself. The two Chunkservers hold the
data. Each Chunkserver keeps one copy of every file written.
The cluster grows the way it was built. Another disk on a Chunkserver machine,
or another machine running a Chunkserver, adds space to the same file system.
Both additions can be done while the cluster
runs without unmounting anything. The mount
point and the file names do not change.
What this cluster is not
There is one Master Server, no Metalogger, and, in PRO
PRO (PRO Edition only), no second Master Server. If the Master machine goes down, the file
system is unavailable until that machine is available again. In PRO, the file
system is also unavailable if either Chunkserver goes down. A Leader needs a
majority of the Chunkservers registered with it. One of two is not a
majority. The Master Server switches to ELECT and answers no requests until
that Chunkserver returns. A third Chunkserver resolves this. The page on
leader election, quorum, and the role of DNS
explains the calculation. In the Community Edition, the Master Server keeps
serving with one Chunkserver left. Nothing on this page limits who may mount the file
system or who may open the GUI. The file system and the GUI are open to every
host as shipped.
These limits are not a defect of the steps above. They separate a cluster that you look at from a cluster that you trust with data. Deployment covers the same steps with none of the shortcuts. Planning & Sizing calculates what to buy before deployment. Access control describes how to limit who may mount the file system and who may open the GUI.